Showing posts with label DIY. Show all posts

Monday, May 14, 2012

Naked Palette #1: Bridal Makeup

A picture is from my own wedding in February 2012! :)

In my opinion, when you look back at your wedding pictures, they should be timeless.  Following some whacked out trend and being embarrassed about your wedding picture in 20 years doesn't sound fun to me.  Personally, I think I picked out a classic dress, did classic hair, and had classic makeup.  

The following pictures aren't my exact makeup from the day (it was the trial I did a few weeks before my wedding day), but I did a similiar look, if not the exact same.  


Main Products Used:
  • Too Faced Shadow Insurance
  • Bobbi Brown e/s:
    - Mahogany (brows)
  • Naked Palette #1 e/s:
    - Virgin (all over)
    - Darkhorse (lid/wing - used scotch tape)
    - Naked (to blend darkhorse and virgin together)
  • MAC e/s:
    - Carbon (lash line)
    - Smolder Eye Kohl (water line)
  • NYX e/s:
    - Highlight (under eye)
  • L'Oreal Infallible liner in Black (lash line)
  • Buxom Lash Mascara
For the face makeup, I mixed some of my foundations, probably MUFE Mat Velvet+ and CoverGirl TruBlend. Flawless skin is important! I topped it off with my HG powder, Covergirl Clean Pressed Powder. 

On the cheeks I have Smashbox blush/highlighter duo in AM/PM.

On the lips I have MAC l/s in Myth and Angel.

Friday, August 12, 2011

DIY: Repairing a Nail Tear

You can buy these silk wraps from Sally Beauty Supply for just a couple bucks.  I don't remember exactly how much they were, but it couldn't have been more than $5.

There's nothing worse than growing your nails out all nice and even then having one tear!  Then you pretty much have to cut the nail with the tear and the cut rest of your nails down to match.  Oye!  I hate that!

Fortunately, we're not the first people on earth with this problem.  lol

These wraps come in a variety of sizes and are all quite long.  They're a thin, mesh fabric with an adhesive backing.  What you do is put nail glue all over your nail with the tear, then place the silk wrap on the nail glue and let it dry.  After it dries, add a layer of nail glue on top of the silk wrap.  Take nail clippers and cut the excess of the silk wrap off (you can use a nail file to make the edge smooth).

Use a buffer to even out the texture of your nail (which will be quite rough at this point).


Avert your eyes!  Natural nails coming up!


My pitiful nail here with a tear... :(  Owwie!  This picture also includes the wrap on top.  I'm not sure why I didn't get a "before the wrap" picture.

The pink is an outline of where the wrap is on my finger.  The green traces the tear.

After you smooth out your wrap, you can apply a base coat (probably a ridge filler would be a great bonus!) and paint your nails.  It won't even look like anything happened! :)

I usually have to replace my wraps every few days, but it gets the job done until my nail grows out far enough for me to cut off the damaged part.  Perhaps roughing up your nail before applying the wrap/glue would be the best approach.

Good luck!

Friday, June 24, 2011

DIY: Organizing Makeup Blog Post Material

 Here's a post written TODAY!  June 24, 2011!

I know this seems like a silly post, but I'd be intersted in seeing how yall organize online blog content!  In my real life, I'm obsessed with organization.  Everything at my house is neatly put away and categorized, etc....

All of my blog content was a disaster when I first started blogging, so I totally revamped a few months ago and I've kept up with it!  There are a few things I'd still like to work on but this is working out so far!

***This will also clear up all the questions about my FOTD post dates!  Lol!***

Anyway, I'll just explain as I go!

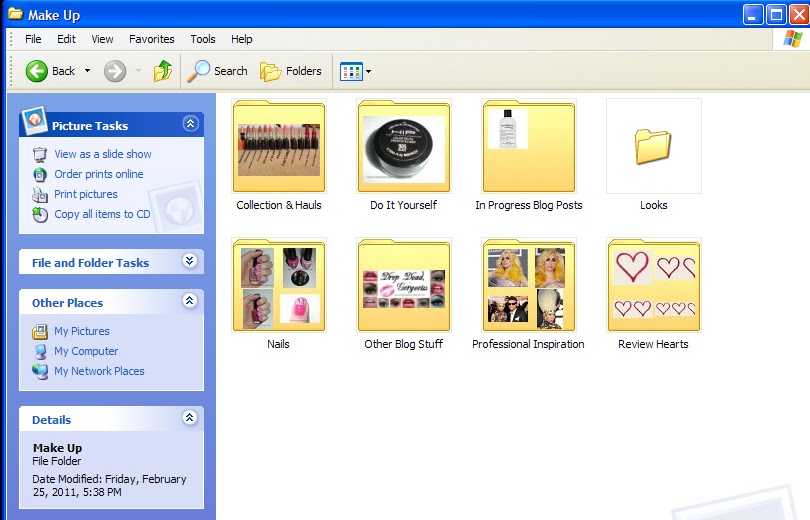
I have a folder on my computer called "Makeup."  This is where I store all pictures.  I have them separated by the various titles.

Here's a quick list of my "Collection and Haul" folder.  This is where I keep all my swatch posts and such.  Yall can view these posts by looking on the left hand side of the screen and clicking "Collection," "Haul," "Review," or "Swatches."


This is my "In Progress Blog Post" folder.  These are pictures that have been resized and tagged with my URL that still need to have the actual POST written out.  I keep them filed away here so when I have a minute to blog, I already know what needs to be done!  :)

As yall can see, I have a few FOTD's that need to have posts written!  When I do my makeup, I write down the date and the makeup I used on a notecard - then I take pictures.  I carry on with my day (or week! lol) and then I'll do another look with a notecard/pictures.  After a while, and I get a minute, I go and resize/tag all my pictures.  So the makeup is done on the day on the folder, and I put that name on my blog title because it just makes it easier to refer to this filing system I have.  Besides, I could just tell yall I did the makeup that day anyway, and yall would be none the wiser! :-P

Another reason they get posted SOOOO far away from the date the makeup was done is because I write several blog posts at a time (saved as drafts) and I try to vary the NOTD and FOTD posts.  More on that later!

This is where I file away all my makeup looks.


Here's my folder full of "Inspiration" posts - yall can see all the looks under my "Inspiration" label on the left hand side.  :)

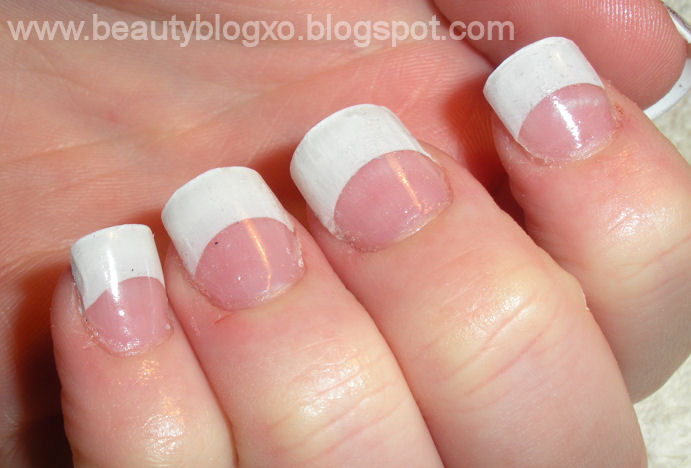
This is just so yall can see in my "Nails" folder too! 


This is how I go about my blogging.  I write several posts and save them up!  For instance, my oldest written post is May 6, 2011.  A month ago!  Lol!  I save them up so if I get busy, I still have some stuff to post up for yall --- or if I just don't accumulate any new content (no FOTDs, NOTDs, hauls, etc), I'll have some back up stuff for yall!  Additionally, I don't want to flood yall with new content whenever I get in a blogging mood!  Did you want me to post 14 posts in one day?  I didn't think so! :-P

So there's just a sneak peak behind the scenes of Drop Dead, Gorgeous!  :-P

Friday, June 3, 2011

DIY: Acrylic Nails At Home - Silver and Pink Glitter

Please view the post HERE for the general "how-to" to achieve this look!


For this mani, instead of painting clear all over the white tips, I used my silver acrylic glitter powder (haul post here) first and applied it over the white.  I let the silver harden a little, which made it easier to apply the pink.  It's all done free hand.  You can get a tool that will help keep the smile lines even, but I don't have it.

Before you attempt this, you might want to consider how you're going to do this on your other hand.  It's not easy and it took me forever!  lol

Also, it's important to constantly wipe your brush.  The glitter gets everywhere if you don't!  You might notice that I have some glitter flecks where it doesn't belong!

After applying the glitter, I used my clear powder and went all over the entire nail and buffed as my other post explains.  :)

Hope you enjoyed!

Saturday, May 28, 2011

DIY: Acrylic Nails At Home - Gold Glitter


 This is to show that you've got to check the nail from all sides to make sure it's even.  I think I did pretty good!  :-P

Please consult the post HERE for the general "how-to" to achieve this at home!

Instead of painting the clear acrylic all over the nail, I put the gold glitter acrylic powder (haul post here) on the white tip and THEN coated everything with the clear powder to seal it in. 

The next day, I decided to glue on (with regular nail glue) some rhinestones.  :)

Hope you enjoyed!

Saturday, May 7, 2011

DIY: Acrylic Nails At Home - French Tips


These are some acrylic nails I did on my sister

I recently had a haul post talking about the products you will need to achieve this at home.  You'll probably need to refer to that post because I'm sure I'll be a slappy when talking about the exact names of the products.  It's been a long day!

Here's a break down of the steps:


**Prep your nails**
  1. Start with clean hands!  Remove any polish (etc) and then wash your hands.  
  2. After pushing cuticles and trimming the natural nails (I like to trim them SUPER short because I hate when you can see the natural nail behind the acrylic tip), rough up the surface of the nail with a nail file or the course side of a 4-sided buffing block. The better you rough up the nail, the better the adhesion of the acrylic.
  3. Apply the dehydrator.  I'm sure you should be really careful to get this ONLY on the nail.  You don't want to dry out your cuticles.
  4. I used a primer as well as a precaution.  I researched so many different ways to do this, and I just figured I'd do both.  It's a quick step and it's a pretty cheap product too. 
Now that your nails are prepped, apply the tips!

  1. Particularly when you're doing this on yourself, you'll want to have all the tips pre-measured out for each finger before you start gluing.  It's harder to work when you've got HUGE nails on!  Lol!  It may also be easier for you to apply the tips to the dominant hand first.  
  2. Clip the nails down to the size you want.  There's special clippers you can get for this, but they're expensive!  Like $20-$30!  I just carefully did it with regular clippers.
I bought the clear acrylic powder (and white tips), so I could apply it on the entire nail.  No need for doing the tip with white and doing the bottom with pink.   That's a more complicated step, more time consuming, more room for error... etc.  You get the idea!

**Applying the acrylic**
  1. Dip your brush in the acrylic monomer/bonder (with paper towel ready!) and dab it off on the side of your container.  I don't recommend doing this is the SAME container that the product is in. Just pour a little bit into a small glass (I used a small votive candle holder). 
  2. Dip the brush into the acrylic powder to get a pearl of product.  If it doesn't pearl, it's too wet or dry.  By the tenth nail, you'll be an expert... lol!  Don't worry!
  3. Apply a thinner coat by the cuticle and gradually get thicker toward the tip of the nail.  ALSO!  Careful not to get this on your skin.  If any of the acrylic gets on your skin and sets, it will make the nails lift very fast!  You'll only get a day or two of wear - and if you're anything like me, you'll pick at it!
**File the nails**

  1. Use your heavy duty file to square the nails off and even out the top of the nail bed.  Depending on how well you applied the acrylic, you may have really thin spots or thick spots.  It's important to look down your finger to make sure it's even.  
  2. I used a drill to finish off this step.  The drill is available at Sally Beauty Supply, but it's not cheap!
 This drill is made for doing acrylic nails, so it has bits specifically for it.

I used this one ^^^ to file down the nail bed. 

Side note: Peep these gold nails I did on myself!  :-P

This bit ^^^ is for filling nails, just as an fyi.


**Make the nails shine**
  1. I used my 4-sided buffing block and some clear top coat on her nails for the glossy top.  
I didn't know at the time, but Sally does sell a buffing board and buffing cream for this.  Don't worry, I'll buy it!  :-)  I can't speak to how well it works (obviously because I don't own it), but it might be something you want to consider if you're doing this!

Finished product:

Friday, March 11, 2011

DIY: Waxing/Filling Eyebrows


Let's start with a before and after.  I don't want a crazy messy eyebrow to be the first thing someone sees when they come to my blog!  lol

Due to all the pictures in this post, please click the link below to read more!

***Disclaimer: Wax your own eyebrows at your own risk.  Getting the wax too hot can result in horrible burns above your eyes.  Always be cautious when applying the wax to your face.  It can burn and blister you if it's too hot.  Just be super careful!  This is just the way I do it for myself and other people.  I am not responsible if you have some sort of mishap while attempting this.  I just need to cover my bases!  :)

Thursday, February 24, 2011

DIY: Water Marbling Your Nails


These are some left over ASP French White nail tips I have that don't fit my fingers, so I thought I'd practice water marbling on them!

I had heard of water marbling before, but the other night I decided to YouTube a video before bed (on my phone...lol!).  I came across SimpleLittlePleasures, and she's a genius basically!  If water marbling is something you're interested in, please check her out!  And no, I don't know her and am not affiliated with her.  She's just GREAT at this and she's very inspiring!  :)

Anyway!  Water marbling, in short, is dropping several drops of nail polish in a cup of water and then dragging your finger nail through it.  Again, check out that YouTuber listed above to see exactly how it's done!

From my SUPER limited experience, I've discovered that the China Glaze neons DO NOT work very well.  They dry super fast or something.  I did my nails this morning (black/white/neon pink) and it didn't look anything like the videos I had seen!  It just looked like a big, globby mess!  I was super disappointed!  Anyway, I broke out my extra tips and I started playing around and I'm happy to see I can do it!

Also, this is a pretty wasteful method of painting your nails (if you care about that).  Normally, it probably takes 1 drop of polish per coat?  With this method, you could easily use 10 drops of polish to paint only one nail.  Maybe don't use your super expensive polishes?  :P

ALSO (again), this is super messy.  But it's fun!  :)

 The third nail above was an attempt to marble China Glaze Red Pearl and China Glaze Ruby Pumps together, but I don't like the results.  It wasn't like I thought it would be.  Live and learn!


For the top right nail, I was hoping to get a blue-zebra print look.  Not sure I did, but I still like it!  :)
The bottom left nail is an example of the marbling of neons.  Those three colors are from the China Glaze Pool Side Collection from last summer.  That huge white gap is a "bald spot" from trying to marble.  :(


And lastly, an up close shot of my two favorites!  :)


**If you're wondering, all the little white squares at the bottoms of the nails are from where I was holding them with tweezers (just a cheapie pair, don't worry!).

Sunday, February 13, 2011

DIY: Reviving Dried Out Products

This was a concept EnKore came up with and this is how I did it myself!

Today (actually, this was done weeks ago!), we're reviving two products: L'Oreal HIP cream liner and a MAC Shadestick in Beige-ing.

First, the liner...


Mine wasn't SUPER dried out, but dry enough that I couldn't use it anymore.

What you need:
  1. The liner
  2. A face primer with silicone (I used my Smashbox, didn't end up needing the other).
  3. Glycerin (MAC Fix+)
  4. Microwave (or hairdryer, as Enkore uses)

Sunday, November 14, 2010

DIY: Cleaning False Lashes

 How to go from this:
To this:

(I didn't even notice that I didn't take a pic of the same lash each time.  I just grabbed one.  Sorry about that!  Anyway, for reference, these are Ardell Demi Wispies)


What I Did
  1. First I picked off what glue I could... obviously they were super gross, and a lot of the glue didn't come off!  lol
  2. Next I soaked them in an alcohol (I used 91%) and water mixture hoping to degenerate the glue (and sanitize the lashes), which worked!  So I pulled off the softened glue carefully.
  3. Then, I put my lashes on a paper towel and used a Q-Tip dipped in eye make up remover to rub the mascara off the actual lashes.
  4. After, I put my lashes in a bowl of soapy water to get the oil from the make up remover off of them.
  5. Finally, I patted them dry and put them back on the little case thing they came in.  
Ta da! They look brand new!

CAUTION:
I tried to clean a cheaper pair of costume lashes this same way, I think they were Claire's brand, and they completely fell apart after I took them out of the alcohol and started pulling off the glue.  Be careful!  :)

Thursday, January 21, 2010

DIY: Depotting and pressing pigments, MAC lipstick haul

I have 2 large (7.5g) MAC pigments and 4 pigments probably half of the large size. I don't use them very much because they get messy and in the mornings I don't have enough time to deal with it. I decided to try pressing them. I used Jardin Aires (the beige) and Copperized (the green) to test this out because I have the most of them. I bought the 91% alcohol (like, $1 at Wal*Mart) and before I bought empty pans and stuff, I decided to try doing this in the two empty pans of a CoverGirl palette I already owned!


It actually worked out pretty great. They're probably a little more powdery than the regular pressed shadows from MAC, but either way, I have been using them more and that was the point in the first place!

After I successfully accomplished pressing some pigments, I decided I was going to buy the 15 pan MAC palette ($12 on MAC's site) and the travel size 4 pan palette ($4? I think). Anyway, I used MakeUpGeek's (youtube) method for depotting using a flat iron and it worked out great!

Here's my travel palette with some shadows! (dazzlelight, print, woodwinked and sable)


Instead of printing labels and all that stuff, I just took the label off the bottom of the pan's compact and stuck it to the back of my pan.


This ^^ is the magnet roll I used. I bought it at Michaels for $2 I think. I couldn't find anything else. I was scared at first that it might be too fat of a magnet and make my shadow pans float too much in my palettes, but they probably only stick out like, 1mm. So I'm happy! I don't care that much!


Moving on, my sweet boyfriend heard me say that I really wanted Viva Glam V from MAC, so he went and just randomly got it for me! :) I absolutely love it!
This is Viva Glam V ^^^

It feels a little empty getting only one lipstick at a time, so I went ahead and bought myself Brave from MAC. At first, Brave and Viva Glam V looked sooo similar and I was worried about that! But! Turns out they have some subtle differences.

This is Brave vvvv


Here's a picture of them together. Brave is slightly more pink than Viva Glam V. Brave is a Satin finish and Viva Glam V is a Lustre finish, so it has kind of a shimmery texture. I usually REALLY go for pinky lip colors, but I think I would say that I like Viva Glam V more. I'll definitely repurchase it. But don't get me wrong, I'm loving Brave right now too!


Just a little side note: This is the flat iron I used to depot my shadows. My other iron broke before I went out of town so I needed one in a pinch. I went to Sally's Beauty Supply and got this super cute pink one! It's even got a little bling bling! Very me! :) It heats up fast and straightens my hair really well! :)
Related Posts Plugin for WordPress, Blogger...